- Sabrina Ramonov 🍄
- Posts
- Build SaaS with AI - Part 7
Build SaaS with AI - Part 7
Part 7: Webhook, Zapier, Styles, and Vercel Deployment
Sabrina Ramonov
August 30, 2024
This is part 7 of my series Build SaaS with AI — where I go from Idea to MVP with AI-driven coding! This is the LAST post of the series.
Let’s wrap things up and get my MVP ready for launch 🙂
Publishing via Zapier webhook
CSS/style updates
Vercel deployment
Here’s the Youtube video for this post:
What type of content do you LOVE?Your vote helps me prioritize what to focus on next! |
Zapier
We’ve got the app working — now we want to publish our remixed content!
I’ll use Zapier in order to avoid setting up social media account integrations. This enables me to focus on improving the core remix functionality, while allowing early users to publish their content and integrate with other tools.
Once our app is able to call Zapier’s webhook, users can do whatever they want with their remixed content.

Follow these steps to recreate the Zap:
Create a New Zap
Go to your Zapier dashboard and click on "Create Zap."
Set Up Trigger: Webhooks by Zapier
App Event: Choose "Webhooks by Zapier" as the app.
Trigger Event: Select "Catch Hook."
Webhook URL: Copy the provided webhook URL.
Test Trigger: Send a test request to the webhook URL to ensure it's working correctly.
Add Action: Split into Paths
App Event: Choose "Paths" as the app.
Action Event: Select "Split into paths."
Path A: Name the path "Facebook."
Path B: Name the path "LinkedIn."
Configure Path A: Facebook
Click on the "Path A: Facebook" section to set up conditions.
Path Conditions: Add the specific conditions for when the Facebook actions should run.
Test Path: Ensure the conditions are correctly set by testing the path.
Add Action to Path A: Facebook Pages
App Event: Choose "Facebook Pages" as the app.
Action Event: Select "Create Page Post."
Set Up Action: Configure the Facebook page details and content to be posted.
Test Action: Send a test post to ensure everything is set up correctly.
Configure Path B: LinkedIn
Click on the "Path B: LinkedIn" section to set up conditions.
Path Conditions: Add the specific conditions for when the LinkedIn actions should run.
Test Path: Ensure the conditions are correctly set by testing the path.
Add Action to Path B: LinkedIn
App Event: Choose "LinkedIn" as the app.
Action Event: Select "Create Share Update."
Set Up Action: Configure the LinkedIn share details and content to be posted.
Test Action: Send a test update to ensure everything is set up correctly.
Review and Turn On Zap
Review all steps to ensure everything is configured correctly.
Name your Zap and click "Turn On" to activate it.
Here’s how to configure the path conditions:
Facebook path should only run if “Platform” in the payload contains the term “Facebook”.
Linkedin path should only run if “Platform” in the payload contains the term “Linkedin”.
Repeat for other social media platforms…

By following these steps, you should be able to recreate my Zap.
Push Data to Zapier Webhook
Now we’re going to push our remixed data to Zapier.
Grab your webhook URL from Zapier.
It looks something like this:

Then, we implement the “Publish” button in our app:
- Use Next.js, Typescript, Tailwind CSS, and App Router.

- Do not use src directory.

- ALWAYS show the proposed directory structure including all new files that must be created.

- ALWAYS show directory structure first.

- For each step in your plan, specify the filename and path to the file.

- ALWAYS add robust logging to help troubleshoot issues.

Complete the following tasks:

- Use the existing "Publish" button in the GeneratedContent component. When user clicks "Publish" button, show a modal with a simple form asking for the webhook URL that the content should be pushed to.

- Validate the webhook URL is a valid URL.

- Create a server-side API route to handle the webhook request. After user submits the form with a webhook URL, send a payload containing the generated text, optional image, and selected social media platform.

- For example, if the user generated content for 2 platforms, Facebook and Linkedin, and the user clicks "Publish" for Linkedin, then the app should send "Linkedin" as the selected social media platform.

- Display all errors to users and handle them gracefully.

- After successfully submitting to the webhook, display a success message.

Act as an expert in fullstack development, and ask me clarifying questions until you are 95% confident you can complete the task successfully.

@GeneratedContent.tsx
Test everything works by remixing some content, then hit “Publish” button.
Paste in your Zapier webhook URL:

In Zapier, you should see the request come in with the following data:
platform
content
image
You may have to click “Find new records” in Zapier to refresh the data.
It should look like this:

Assuming you’ve connected your Facebook and Linkedin accounts…
The Zapier workflow should detect the content, image, and platform, then created a social media post automatically with the remixed content!
Hurray! 🥳
I encountered one minor issue — I couldn’t close the modal with the webhook URL form even after successfully publishing the content. So, in the same chat context, I instructed Cursor AI to fix it. All done!
CSS and Styles
Next, I want to update the CSS and style of the Prompts table and navigation bars (Sidebar and Topbar components).
Go to Dribbble and browse amazing designs!
I like this clean table and sidebar created by Omer Erdogan:
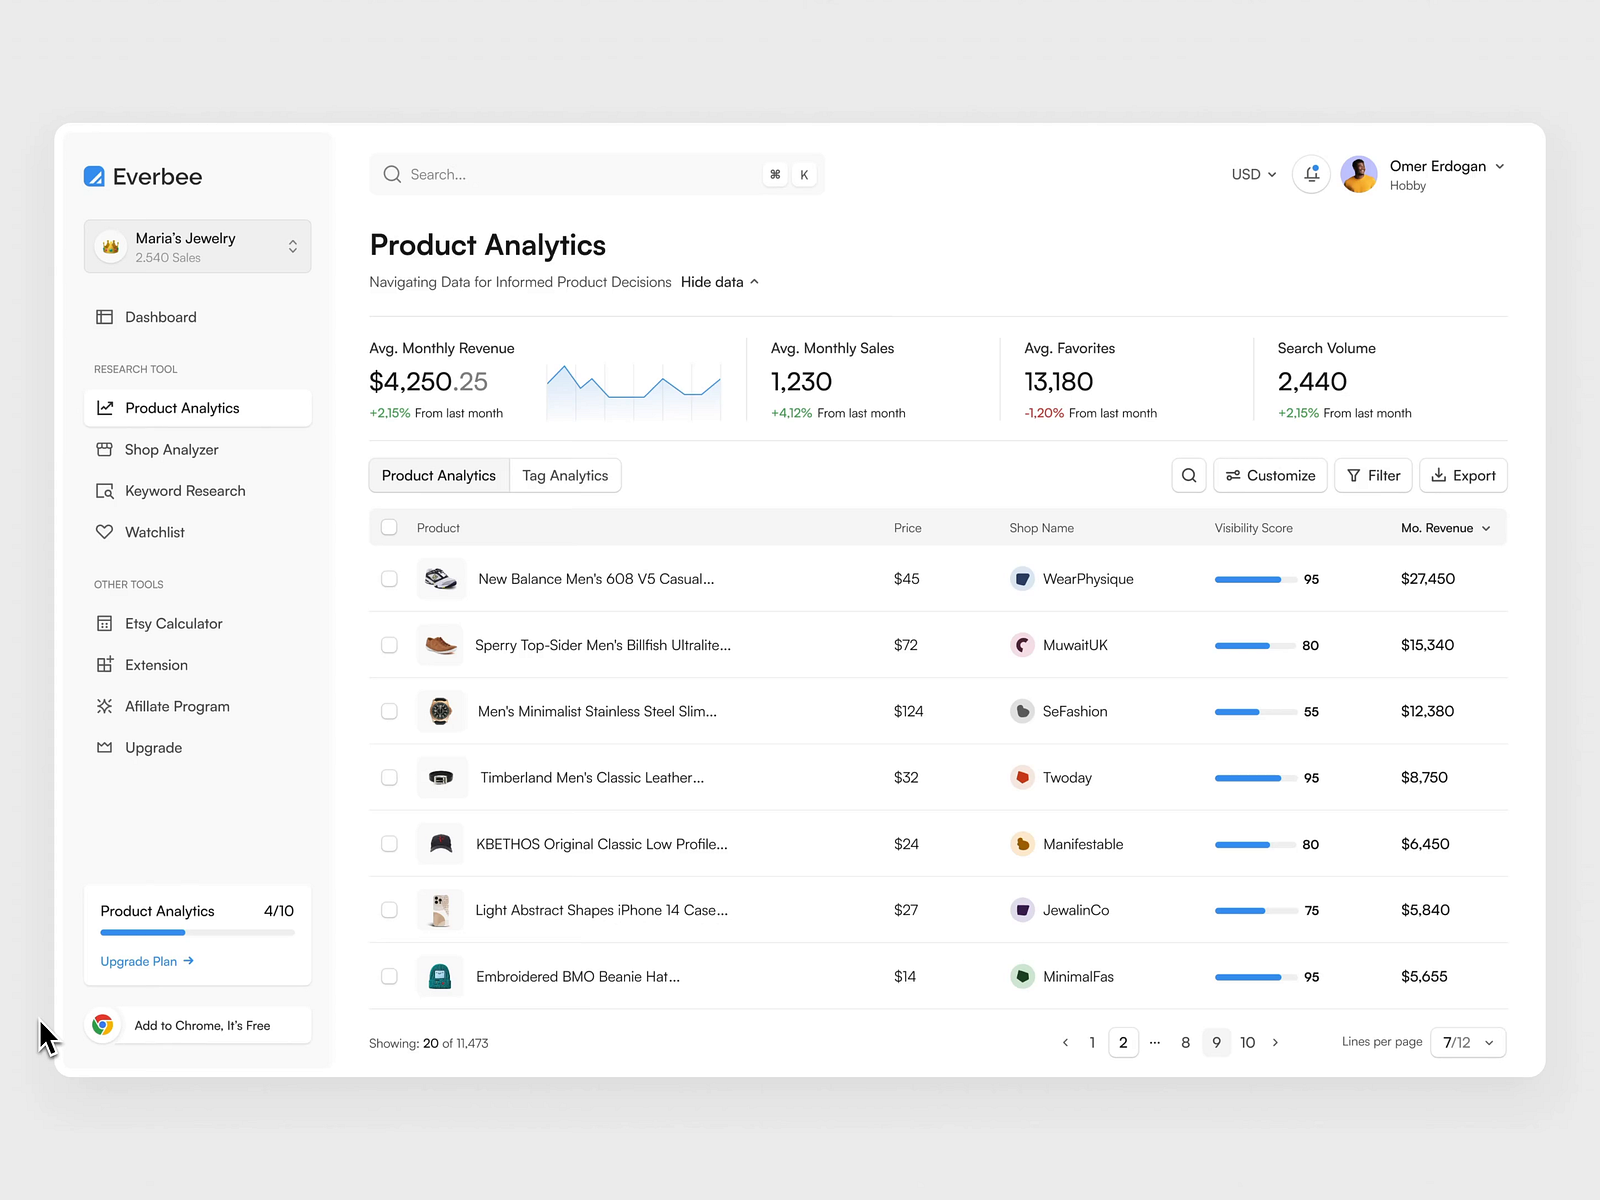
Let’s use the non-Composer AI chat in Cursor because it’s easier to attach an image there. Don’t know why, but lately I’ve been having issues attaching images in Cursor — both Composer and normal AI Chat.
Here’s the prompt to analyze the Dribbble design and update our app, focusing on the prompts table and navigation bar:
- Use Next.js, Typescript, Tailwind CSS, and App Router.

- Do not use src directory.

- ALWAYS show the proposed directory structure including all new files that must be created.

- ALWAYS show directory structure first.

- For each step in your plan, specify the filename and path to the file.

- For next.js components that require client side state, use 'use client'.

- Tailwind config is specified in tailwind.config.ts

- Use a modern color palette, ensuring that any user-facing text is readable and visible. Force the text colors everywhere to ensure only light mode is supported.

- ALWAYS add robust logging to help troubleshoot issues.'

Complete the following tasks:

- Analyze the attached image's CSS and styles, especially focusing on the sidebar and table styles.

- Update the app's CSS and styles so that it is a similar look and feel as the attached image. Do NOT rearrange the layout of components. Do NOT create new screens. Your focus is on the CSS and styles. You are NOT copying the image, but instead focusing on general CSS and styling.

- Don't change the current app structure.

Act as an expert in frontend engineering, and ask me clarifying questions until you are 95% confident you can complete the task successfully.
As Cursor says, you need to install the following package.
Run this command in your terminal:
npm install react-icons And, then run npm run dev to test everything works!
Check out how the updated sidebar and prompt table looks 😎
Much nicer!

Vercel Deployment
To wrap up this series, we’re going to deploy the app on Vercel.
If you haven’t yet, sign up for a Vercel account.
Ask Cursor AI, “How do I deploy this app to Vercel?” and it will walk you through step-by-step.

Before creating a new project, clean up all your git commits, merge to main, and push to github.
Then, go to Vercel, create a new project, and import the github repo.
Click “Deploy”.
Most likely, as I did, you’ll encounter various errors.
Paste each error into Cursor to help you fix them.
I recommend running npm run build in your local terminal to fix all errors locally first before deploying again to Vercel. Once you’ve fixed all errors, then deploy again to Vercel.
You should see an error about missing Environment Variables.
You need to add environment variables from your .env.local file to Vercel.
Go to your Vercel projects > Settings > Environment Variables and add your environment variables in the section with Key Value pairs:

Click Save.
Re-deploy your app.
This can take a few minutes.
When successful, here’s what you should see.
Click Visit to see the app deployed at a publicly accessible URL!

Wrap Up
Here’s my SaaS MVP fully deployed and functional on a public URL!
It includes:
user authentication
AI image generation
prompts management
publishing via webhooks
Firebase Firestore database
repurposing content to multiple platforms
easily editing prompts to re-generate content
Everything I need to test-drive the MVP for myself as a content creator…
And, start getting feedback from early users!

In 7 videos (2 of which didn’t involve coding), I’ve gone from idea to MVP, leveraging AI to code for me.
I still haven’t touched a line of code! 🤯
Let that sink in…
Obviously, I’m going to update the app URL so it’s easy to remember. I also need to think of a new name because it’s too hard to SEO rank on “remix” 🤣
To close out this series, here are my last thoughts:
Cursor AI
I love the user experience with the new Cursor Composer.
It’s smooth and seamless applying, testing, and undoing code suggestions. The productivity boost is immense.
But I’ve found code quality noticeably better with other AI coding assistants:
With Cursor, I need to commit very frequently and be extra careful not to break any existing functionality. I don’t know the secret sauce behind Aider and Zed, but from my limited testing, they seem to produce better code suggestions.
Low code vs AI driven coding
I’m frequently asked whether you should start with AI-driven coding if you have zero technical or product background.
It’s definitely possible.
Here’s a 23-year old who made millions with his first mobile app, entirely coded with AI. It took him a little over a month to build the app because it was his first time. Zero tech background. He used AI at every step. But, with all he’s learned and his skillset today, he estimates it’d take him 3 days to rebuild the same app.
But, if you’re not interested in learning tech or don’t have bandwidth right now, I recommend trying no-code tools:
Many MVPs can be built leveraging these no-code tools.
For my app, from the start, I knew I’d need to have a job queue as well as video creation and editing workflows. These would be immensely painful to build in Bubble.io and deliver a world-class user experience, so I opted for AI-driven coding from the beginning.
Mindset and mentality
Most importantly, many of you reading this may want to build your own app one day or you’re working on an app right now.
Don’t get discouraged when you get stuck.
Keep in mind:
The average software engineer has a 4-year college degree AND years of industry experience. Tools that engineers take for granted, e.g. git version control, may look scary.
But I promise, if you stick to it, you can learn it.
And, that’s pretty much true with anything!
Did I miss anything?
Have ideas or suggestions?
Message me on LinkedIn 👋

Sabrina Ramonov
P.S. If you’re enjoying my free newsletter, it’d mean the world to me if you share it with others. My newsletter just launched, every single referral helps. Thank you!
share by copying and pasting the link: https://www.sabrina.dev